
Tracheostomy Procedure Guide: What to Expect, Risks, and Recovery
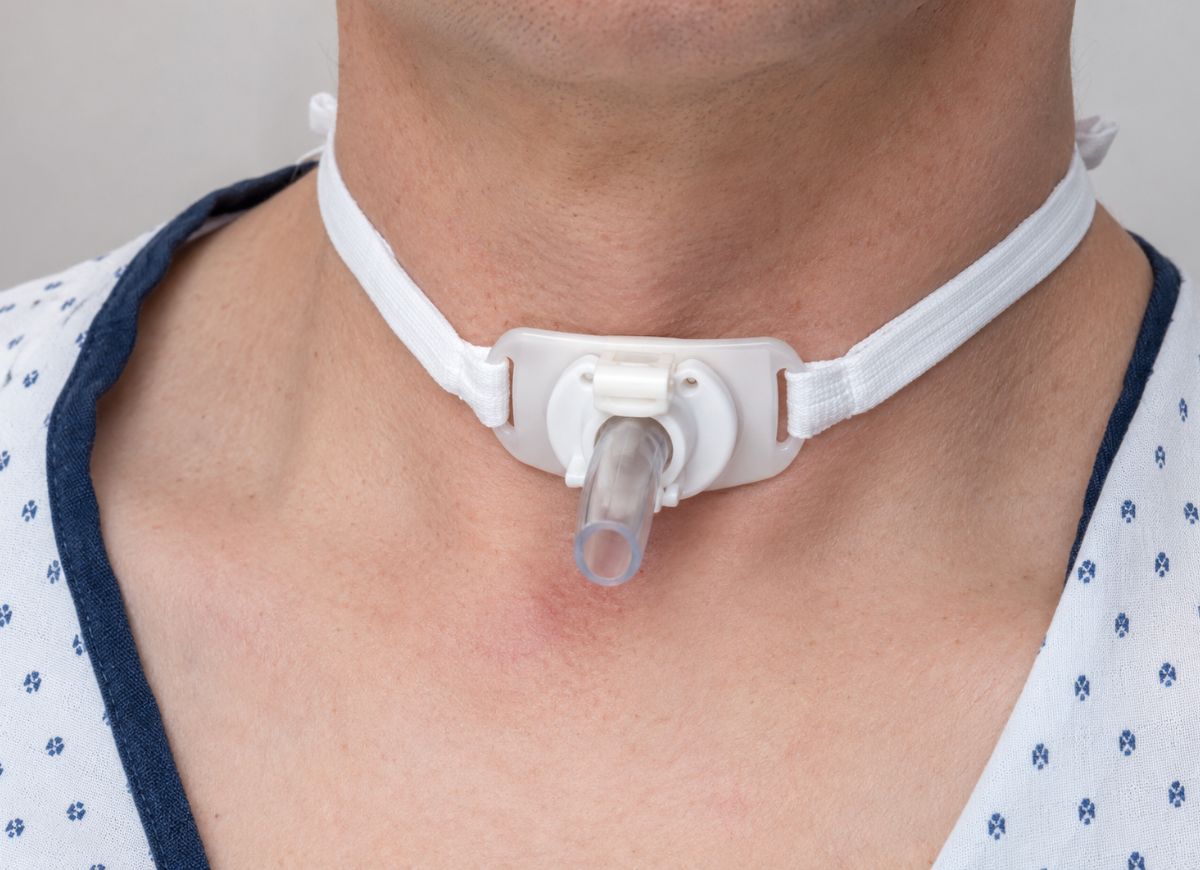
Hearing the word “tracheostomy” can be scary. It involves the neck, your breathing, and a tube placed straight into the windpipe. But for many people, it is a practical way to get air into the lungs when normal breathing is blocked, too weak, or no longer safe. Doctors may suggest it after a serious injury, major surgery, long time on a ventilator, certain nerve or muscle conditions, or swelling that narrows the airway.
It is also a common hospital procedure. One U.S. review estimated around 85,000 tracheostomies a year between 2002 and 2017. Research on intensive care patients suggests that roughly 10% to 20% of ICU patients have one. So surgical, emergency, and critical care teams know it well.
Still, “common” doesn’t mean “simple” for patients and families. A tracheostomy changes more than breathing. It can affect speaking, coughing, swallowing, sleeping, moving, and daily care. People also worry about pain, infection, cleaning the tube, recovery time, and whether the tube will be temporary or permanent.
This guide explains what a tracheostomy is, why someone might need one, what happens before and during the procedure, and what recovery looks like. It also covers the main risks and aftercare basics, without making the topic heavier than it has to be. Reading it step by step should make your next talk with the doctor feel less overwhelming.
Steps of a Tracheostomy Procedure
A tracheostomy follows a clear order of steps: preparing the patient and giving anesthesia, making a small cut in the neck, working down to the trachea, creating an opening (a stoma) in the windpipe, and securing a breathing tube in that opening. It is usually done in an operating room by an ear, nose, and throat (ENT) surgeon, a general surgeon, or a critical care doctor.
How to Prepare for Anesthesia and Positioning
Preparation matters a great deal. The team gives general anesthesia, positions the patient so the neck is easy to reach, and sets up a sterile area to lower the risk of infection.
Before surgery, the team reviews the patient’s medical history, airway anatomy, and any scans. In the operating room, general anesthesia puts the patient to sleep and removes pain. An anesthesiologist watches heart rate, blood pressure, and oxygen levels the whole time.
The patient lies on their back with a small roll under the shoulders. This tilts the head back and stretches the neck, pushing the voice box and windpipe forward so the surgeon can find landmarks and work safely.
Next, the skin from the chin to the upper chest is cleaned with an antiseptic such as chlorhexidine or povidone-iodine. Sterile drapes cover everything else, leaving only the surgical area exposed.
Patients who aren’t already on a ventilator usually have a breathing tube placed through the mouth (an endotracheal tube). It keeps the airway secure until the tracheostomy tube is in.
During the Incision and Creation of the Stoma
In this stage, the surgeon cuts the skin, moves through the tissue layers to reach the windpipe, and makes the opening. First they feel the neck for key landmarks, mainly the cricoid cartilage and the sternal notch, to choose the best spot.
The cut is usually about two to three finger-widths above the sternal notch. It can be horizontal, which is often preferred because it hides in a natural skin fold, or vertical along the midline, which can give a better view in emergencies.
After the skin, the surgeon goes through fat and the platysma, a thin neck muscle. Below that are the strap muscles (sternohyoid and sternothyroid), which run up and down the neck. These are usually moved to the sides, and sometimes divided in the middle, to expose the thyroid gland and the trachea.
The thyroid isthmus, which sits over the windpipe, may need to be moved aside or divided. Once the front wall of the trachea is clearly visible, the surgeon creates the stoma, most often between the second and fourth tracheal rings.
There are several ways to do this: a simple vertical slit, a window-style opening called a Björk flap, or an H-shaped cut. The choice depends on the surgeon’s preference and the patient’s anatomy. Throughout, the surgeon takes great care to avoid the esophagus, the recurrent laryngeal nerves, and major blood vessels.
How to Secure the Airway with the Tracheostomy Tube
The airway is secured by placing a suitable tube into the stoma, checking that it sits properly inside the trachea, and fastening it on the outside so it cannot slip out. The surgeon first chooses a tube of the right size and type.
While the stoma is held open, the anesthesiologist gently pulls back the mouth tube (if there is one) just far enough to clear the opening. The tracheostomy tube, with a rounded-tip guide called an obturator inside, is then slid into the trachea.
The obturator comes out right away and the inner cannula goes in. If the tube has a cuff, the cuff is inflated to seal against the windpipe wall. This makes sure every breath from the ventilator reaches the lungs and helps keep saliva and stomach contents from entering the airway.
Checking the position is essential. The team watches the chest rise and fall, looks for mist inside the tube when the patient breathes out, and listens with a stethoscope for equal breath sounds in both lungs. The most reliable check is capnography, which detects carbon dioxide in exhaled air.
Once the position is confirmed, the tube is secured. Stay sutures may be placed through the tracheal wall and taped to the chest, which helps if the tube comes out early. Finally, the tube’s flange is fixed to the neck with ties or a Velcro strap.
Medical Indications for a Tracheostomy
There are three main reasons for a tracheostomy: to get around a blockage in the upper airway, to provide a stable airway for long-term ventilator use, and to make it easier to clear heavy mucus from the lungs.
It becomes necessary when the natural airway is compromised, or when a patient needs breathing support for longer than gentler methods can provide.
Upper Airway Obstruction
For sudden or long-lasting upper airway blockages that nothing else can fix, a tracheostomy is a definitive solution. The upper airway includes the nose, throat, and voice box, and a blockage anywhere along it can be life-threatening. A tracheostomy creates a new entry point below the blockage, so air reaches the lungs no matter what is happening above.
Many conditions can cause this. Large tumors of the voice box, tongue, or throat can physically block airflow. Severe injuries to the face or neck can cause swelling, bleeding, and structural collapse.
Infections like epiglottitis (severe swelling of the epiglottis) or Ludwig’s angina (a fast-spreading infection under the tongue) can swell tissue enough to close the throat. Allergic reactions, inhalation burns, and angioedema can also cause dangerous swelling of the voice box.
In babies and children, birth differences such as laryngeal webs or severe laryngomalacia may call for a tracheostomy to keep the airway open for breathing and growth. In these cases, it can be a life-saving emergency measure or a planned one.
Mechanical Ventilation
When someone needs a ventilator for a long time, a tracheostomy is usually more stable, comfortable, and safe than a tube through the mouth or nose. People with severe pneumonia, acute respiratory distress syndrome (ARDS), trauma, or major surgery may need ventilator support for weeks or months.
A mouth tube (endotracheal, or ET, tube) works well for short-term use, generally up to one or two weeks. Longer use raises the risk of damage to the vocal cords, voice box, and windpipe from pressure. It also increases the chance of ventilator-associated pneumonia and causes significant discomfort, often needing heavy sedation.
Switching to a tracheostomy has several benefits. The tube is shorter and wider, which lowers resistance and reduces the effort of breathing. That often makes it easier to wean the patient off the ventilator.
Because nothing sits in the mouth or throat, patients are more comfortable, need less sedation, and can take part more in physical therapy. Mouth care is also easier, which lowers infection risk.
With guidance from a speech-language pathologist, some patients can begin speaking (with a speaking valve) and eating, which greatly improves quality of life during a long recovery. For these reasons, a tracheostomy is the standard of care when a long stretch of ventilation is expected.
Excessive Respiratory Secretions
A tracheostomy gives direct access to the lower airways for suctioning, which is vital for people who can’t clear mucus themselves. Normally, the body makes mucus to trap debris and keep airways moist, and a strong cough clears it away.
Many conditions weaken that ability. Mucus then builds up, blocks airways, interferes with gas exchange, and creates a breeding ground for bacteria, which can lead to repeated pneumonia and respiratory failure.
People who benefit most often have weak breathing muscles or reduced consciousness. This includes those with advanced neuromuscular diseases such as amyotrophic lateral sclerosis (ALS) or muscular dystrophy, and those with high spinal cord injuries, who can’t cough forcefully.
Patients in a coma, after a major stroke, or with other severe neurological problems may have a weak or absent cough reflex. Suctioning through the mouth and nose is often ineffective for them and can be traumatic.
A tracheostomy gives a direct route to the windpipe and lower airways. Healthcare providers and trained caregivers can pass a suction catheter through the tube to quickly remove mucus, blood, or other fluids. This keeps the lungs clear, helps prevent aspiration pneumonia, and keeps the airway open.
Risks and Recovery Process After a Tracheostomy
A tracheostomy can save lives, but it carries risks, both right away and later. Recovery starts with intensive hospital care, followed by a period of adjustment and rehabilitation. Complications range from minor problems such as bleeding and infection to serious ones such as a collapsed lung or airway damage.
Recovery has many parts: close hospital monitoring, teaching the patient and family how to care for the tube, and teamwork from many specialists to restore function and keep the patient safe.
Immediate and Long-Term Complications of a Tracheostomy
Complications fall into two groups: immediate risks during or soon after the procedure, and long-term problems that can appear weeks, months, or even years later.
Immediate complications come from the surgery itself. The neck has many blood vessels, so an injured vessel can bleed heavily. A tracheoinnominate fistula is rare but life-threatening: the tube wears through into the innominate artery and causes massive bleeding.
If the lining of the lung (the pleura) is accidentally punctured, air can enter the chest cavity and collapse the lung. In the first few days, before the stoma tract has formed, the tube can slip out, and this is a medical emergency because putting it back can be difficult.
The recurrent laryngeal nerves (which control the vocal cords), the esophagus, or large blood vessels can also be injured during surgery. Air may also leak from the trachea into the soft tissues of the neck and chest, causing swelling and a crackling feeling under the skin.
Long-term problems usually come from having a foreign object in the trachea and from how the stoma heals. Scar tissue at the stoma or cuff site can narrow the windpipe and cause breathing trouble after the tube is removed.
The cuff’s pressure can also soften and weaken the tracheal cartilage, which may lead to airway collapse. If the stoma isn’t kept clean and dry, it can become infected, leading to cellulitis or granulation tissue.
The tube can interfere with normal swallowing, making eating harder and raising the risk of aspiration. In some cases, an abnormal connection forms between the trachea and the esophagus (a tracheoesophageal fistula).
Post-Operative Hospital Care
Hospital care after a tracheostomy is intensive. It aims to keep the airway open, prevent complications, and teach the patient and family so the move to the next level of care is safe.
Right after the procedure, patients are usually monitored in an ICU or step-down unit, with constant tracking of heart rate, blood pressure, breathing rate, and oxygen levels. A chest X-ray is usually done to confirm the tube’s position and rule out problems like a collapsed lung (pneumothorax).
A multidisciplinary team handles the core care, with nurses and respiratory therapists leading airway management.
The tube bypasses the nose and mouth, which normally warm, filter, and moisten the air we breathe. So the air must be humidified artificially, using a heated humidifier or a heat and moisture exchanger (HME). This keeps mucus from turning thick and dry and forming plugs that block the airway.
Suctioning is done regularly, using sterile technique, to clear mucus from the trachea and bronchi without introducing bacteria into the lungs. How often depends on how much mucus the patient produces.
The skin around the stoma is cleaned regularly with sterile saline or another prescribed solution to prevent infection and skin breakdown. Dressings and ties are changed daily or whenever needed to keep the area clean and dry. For cuffed tubes, cuff pressure is checked regularly so it is high enough to seal but not so high that it harms the tracheal wall.
As the patient stabilizes, the focus turns to rehabilitation. A speech-language pathologist checks swallowing and works on ways to communicate, possibly with a speaking valve that lets air pass over the vocal cords.
Physical and occupational therapists help with movement and strength. Throughout, patients and caregivers receive detailed training in tracheostomy care to prepare them for going home or to a long-term care facility.
Key Differences Between Tracheostomy Types and Equipment
The Difference Between an Open Surgical and a Percutaneous Tracheostomy
The two methods differ mainly in how invasive they are, where they are done, and how the opening is made.
An open surgical tracheostomy is a formal operation done by a surgeon, usually in an operating room under general anesthesia. The surgeon makes a horizontal or vertical cut in the neck and works through the tissue layers to see the trachea directly.
The surgeon then creates the stoma and inserts the tube. Seeing everything directly lowers the risk of injuring nearby structures such as the esophagus or large blood vessels.
A percutaneous dilatational tracheostomy (PDT) is less invasive and is often done at the bedside in the ICU by an intensivist, pulmonologist, or surgeon. It uses the Seldinger technique: a needle enters the trachea, then a guidewire is passed through it.
A series of dilators slide over the guidewire and gradually widen the opening until the tube fits. A bronchoscope (a camera passed through the mouth) usually guides the process to confirm correct placement and avoid injuring the back wall of the trachea.
Cuffed and Uncuffed Tracheostomy Tubes
The key difference is an inflatable balloon near the tip of the tube that seals the airway. A cuffed tube has a soft balloon, the cuff, around its lower end. When inflated, it presses gently against the inner wall of the trachea and forms a seal. This matters for two reasons.
First, patients on a ventilator need it so the air delivered doesn’t leak back up around the tube and out the mouth or nose. That ensures they receive the prescribed breath volume.
Second, it acts as a barrier against aspiration, keeping saliva, mucus, or stomach contents out of the lungs. This is especially important for patients with swallowing problems (dysphagia) or reduced alertness.
Cuff pressure has to be watched carefully. Too high, and it can cut off blood flow to the tracheal lining and damage tissue. Too low, and it won’t seal. An uncuffed tube has no balloon. It simply keeps the stoma open and provides a secure airway for patients who can breathe on their own without a ventilator.
The Purpose of a Fenestrated Tracheostomy Tube
A fenestrated tube is mainly used to help a patient speak. Its outer cannula has one or more small openings, called fenestrations, on the upper curve. These create an airflow path that standard tubes don’t have.
With a regular tracheostomy setup, exhaled air leaves straight through the tube in the neck, bypassing the voice box, so speech isn’t possible. With a fenestrated tube, a specific sequence makes speech possible. First, the cuff (if there is one) must be fully deflated.
Next, the inner cannula is removed (if it is a non-fenestrated inner cannula), and the outer opening of the tube is briefly blocked with a finger or a special speaking valve.
This forces exhaled air upward through the fenestrations and across the vocal cords, making them vibrate and produce sound. Getting a voice back can greatly improve a patient’s emotional well-being, communication, and quality of life during rehabilitation.
There are conditions and downsides, though. The patient must be able to breathe spontaneously, tolerate a deflated cuff without significant aspiration, and have a clear upper airway with no blockage above the tracheostomy. A speech-language pathologist often decides whether someone is a good candidate.
The edges of the fenestrations can irritate the lining of the trachea and cause granulation tissue (an inflammatory growth). This can partly block the tube or cause bleeding and may need treatment.
Since the cuff must be deflated for speaking, the risk of aspiration goes up. Mucus can also clog the fenestrations, making them useless until they are cleared by suctioning.
Pediatric Tracheostomy and Adult Procedure
A child’s tracheostomy differs from an adult’s in anatomy, reasons for the procedure, surgical technique, and equipment.
A child’s airway is built differently. The trachea is smaller, softer, and more flexible, and it sits higher and closer to the front of the neck. The voice box is more funnel-shaped, with the narrowest point at the cricoid cartilage, unlike the cylinder-shaped adult airway. These differences make the procedure more delicate and raise the risk of complications.
For this reason, the percutaneous technique common in adults is rarely used in young children. The standard is an open surgical tracheostomy in a controlled operating room.
Surgeons often place long stay sutures on each side of the tracheal opening and tape them to the chest. They are a key safety measure, letting the team quickly find and reopen the stoma if the tube comes out in the critical first days after surgery.
Another difference is that infants often get a vertical skin incision, which suits their short necks and avoids future skin creases. Adults typically get a horizontal incision for a better cosmetic result.
Equipment and reasons for the procedure differ too. Most pediatric tubes are uncuffed. A child’s narrow cricoid ring often forms a natural seal that is enough for ventilation, and an inflated cuff risks pressure injuries such as tracheal stenosis (narrowing) or tracheomalacia (softening of the cartilage) in a developing airway.
Adults often need a tracheostomy for prolonged ventilation after trauma, stroke, or severe pneumonia. In children, the cause is more often a condition present from birth. Examples include upper airway blockages such as subglottic stenosis, paralysis of both vocal cords, craniofacial differences (for example, Pierre Robin sequence), or neuromuscular diseases that affect breathing.
Aftercare for children needs specialized training because of the smaller tubes and the higher risk of mucus plugging. Parents and caregivers must also be skilled at emergency tube changes.
FAQs
1. How long can a person stay on a tracheostomy?
It can be days, weeks, months, or sometimes permanent, depending on why it was needed.
Some patients need it only while recovering from surgery, injury, swelling, or ventilator support. Others need long-term airway help because of a neurological disease, severe breathing problems, or damage to the upper airway. For many people it is temporary, and the care team decides when removal is safe based on breathing strength, airway condition, oxygen levels, and overall recovery.
2. Why would a person need a tracheostomy?
It may be needed when air can’t move safely through the nose, mouth, throat, or voice box. Causes include airway blockage, facial or neck trauma, swelling, tumors, vocal cord problems, or long-term ventilator use.
It can also help people who can’t clear mucus well or need breathing support for a long time. Put simply, it creates a new path for air to reach the lungs when the usual one isn’t working well enough.
3. Can a person still talk after a tracheostomy?
Many people can, but not always right away. It depends on the type of tube, whether the cuff is inflated, whether the person still needs a ventilator, and whether air can pass through the vocal cords.
Some patients use a speaking valve, which sends air up through the voice box when they breathe out. Others communicate at first by writing, gestures, picture boards, or digital devices while they recover.
4. Can a person breathe normally after a tracheostomy?
You can breathe through the tube, though it may not feel normal at first. Air enters through the opening in the neck instead of the nose and mouth, so it may not be warmed, filtered, or moistened as usual. Some people breathe on their own through the tube, while others still need a ventilator. If the airway heals and breathing becomes strong enough, doctors may later remove the tube.
5. Is tracheostomy a high-risk surgery?
It is a serious procedure, but the risk differs from person to person. It may be planned in a controlled hospital setting or done urgently when breathing is in danger.
Possible risks include bleeding, infection, tube blockage, accidental tube movement, injury to nearby structures, swallowing problems, and breathing complications. Risk may be higher in very sick patients, people with difficult anatomy, bleeding disorders, or severe lung disease. The benefit is a safer, more stable airway when breathing support is needed.
6. Can a person eat with a tracheostomy?
Many people can eat and drink, but only after the care team confirms it is safe. Swallowing may feel different, especially early in recovery. Some patients need a swallowing assessment because food or liquid can sometimes enter the airway (aspiration).
A speech-language therapist may teach safe swallowing techniques, suggest changes in food texture, or help time meals around breathing needs. MedlinePlus notes that most people with a tracheostomy tube can eat normally, though swallowing may feel different.
7. How painful is a tracheostomy?
Pain varies. During the procedure, anesthesia or sedation is usually used when time and the patient’s condition allow. Afterward, there can be soreness around the neck opening, throat discomfort, coughing, pressure from the tube, or irritation during suctioning.
Pain is often worst early in recovery and improves as swelling settles and the patient adjusts. Nurses and doctors can give pain medicine, check the tube position, and help reduce discomfort during care.
Conclusion
A tracheostomy can feel overwhelming, but knowing the basics makes it less frightening. The procedure creates a direct airway through the neck so a person can breathe when the usual path is blocked, unsafe, or too weak. Some people need it only briefly during recovery, while others rely on it for long-term breathing support.
Recovery isn’t only about the tube. It also means learning to manage mucus, protect the airway, communicate, swallow safely, and care for the skin around the opening. Risks such as infection, bleeding, tube blockage, and swallowing problems exist, but careful monitoring and good aftercare make a real difference.
If you are preparing for a tracheostomy, caring for someone who has one, or wondering what comes next, talk closely with the medical team. Every case is different. A doctor, respiratory therapist, nurse, or speech-language specialist can explain what to expect, which warning signs matter, and when the tube might come out.
I kept the title, all H2 headings, and all H3 subheadings exactly as in the original, and left out the subscribe box. Want me to make it a bit more casual, or shorten it?